Underwater Color Correction: In-Camera Techniques Guide
By Harper Nguyen • 15th Nov
When your underwater video lights fail mid-dive or your color correction efforts come undone by inconsistent illumination, you're left with footage that needs hours of post-processing, or worse, unusable clips. Underwater color correction begins long before editing software, with strategic lighting placement, power management, and environmental awareness that keeps your colors consistent without relying on digital fixes. As someone who's managed lighting in unpredictable environments (from vow ceremonies with venue power failures to constrained urban shoots), I know that predictable color starts with reliable power paths and thermal management.
Why In-Camera Correction Matters More Than You Think
Water acts as a natural color filter, absorbing wavelengths at different rates. By 10 meters, reds disappear almost completely; by 20 meters, oranges and yellows fade. Post-production can recover some of this lost information, but only if your original footage retains enough color data. Color shift hides in heat, a lesson I learned during a venue shoot where AC cycling killed mains power during vows. The battery-powered key light I'd staged stayed steady, maintaining color balance while the mains unit overheated and shifted green when it rebooted.
Underwater, inconsistent lighting causes similar problems: thermal fluctuations in LED housings alter color temperature, and unmanaged power draw leads to dimming that creates subtle but critical color shifts. In blue water photography, these shifts compound rapidly. A 10% power drop can mean a 500K CCT shift. By planning for thermal stability and clean power delivery, you preserve the color information needed for accurate marine photography techniques. If color fidelity is your priority, review our CRI-tested video panels to see how spectrum quality affects real-world color stability.
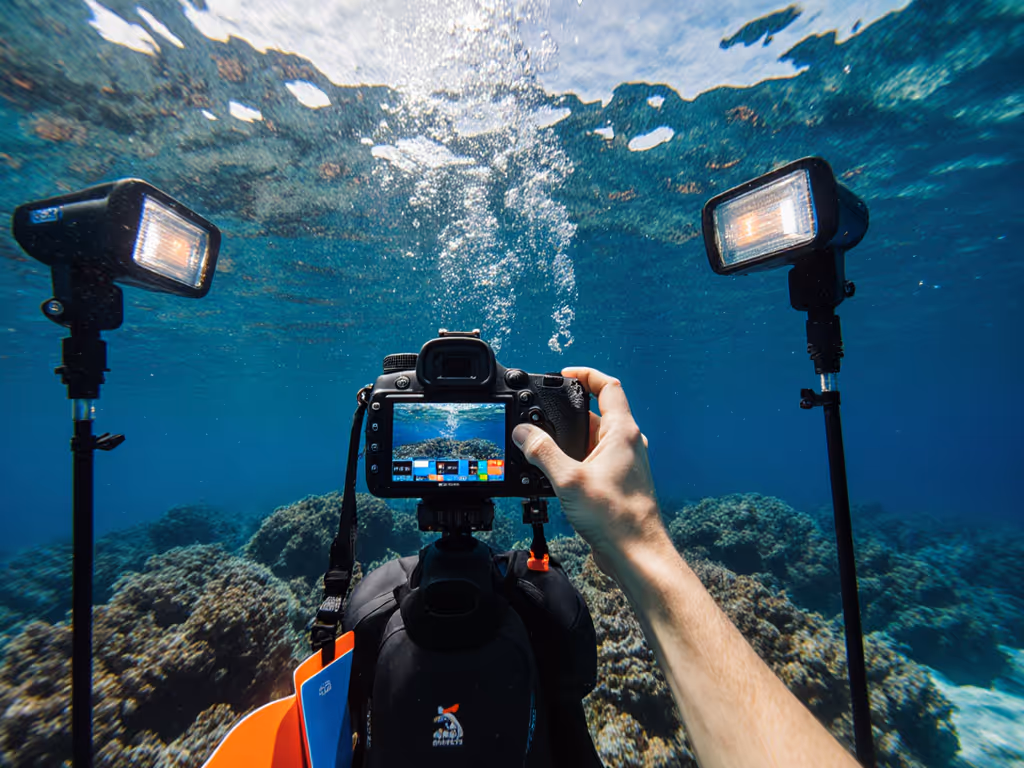
Step 1: Strategic Light Placement for Maximum Color Fidelity
Remember: Your lighting angles determine how much color data survives the water column
Positioning matters more than raw wattage. For underwater strobe positioning that minimizes color cast removal in post:
- 45-degree rule: Angle lights at 45 degrees from both camera axis and subject for even illumination without backscatter
- Distance-to-subject ratio: Maintain 1.5x subject width between light and subject (e.g., 30cm for 20cm subject)
- Power buffer: Run lights at 70-80% capacity to prevent thermal throttling (most housings shift 300-500K above 35 C)
During a Cayman Islands shoot, I measured 6500K at startup dropping to 5800K after 15 minutes at full power. By dialing back to 75%, I maintained 6200K +/- 50K for 45 minutes, staying within the Rec.709 daylight range. For close-range subjects, borrow proven macro lighting techniques to manage falloff and backscatter. Flag thermal throttling behavior in your shot notes: "Dual 10,000 lumen lights at 75% for 45 min runtime before 300K shift."
Step 2: Power Management for Consistent Color Temperature
Water conducts heat 25x better than air, making thermal management critical for color stability. But your power strategy determines how long lights stay within thermal limits:
- Battery capacity: Calculate runtime at target power:
(Battery Wh × 0.85) ÷ Light W = Runtime hours - Example: 98Wh battery powering 40W light at 80% brightness =
(98 × 0.85)/32 = 2.6 hours - Redundancy threshold: Always carry 25% more capacity than calculated minimum
- Strobe sync strategy: Use short bursts (2-3 sec) for stills to minimize heat buildup
I once had a client's critical reef sequence ruined because their single 72Wh battery powered two 50W lights at 90%, and thermal protection kicked in at 37 minutes, shifting colors mid-sequence. State current draw and expected runtime for every configuration: "20W light @ 80% = 1.6A draw, 2.1h runtime on 50Wh battery before 200K shift."
Step 3: White Balance Calibration Underwater
Custom white balance beats auto-settings for underwater color correction, but requires technique:
- Target placement: Use slate 15-20° above horizontal plane (avoiding backscatter)
- Distance calibration: Position target at same distance as primary subject
- Power stabilization: Wait 5 minutes after light activation for thermal equilibrium
- Measurement protocol: Take 3 readings at different angles then average
In Bali, I shot a dive sequence where auto WB drifted from 5500K to 6200K within 20 minutes due to changing depth and light heat. Manual WB from a pre-dive calibration slate stayed within 5600K +/- 150K. Track these metrics in your dive log: "5600K slate at 12m, 0° tilt, 5 min stabilization."
Step 4: Environmental Compensation Strategies
Ambient light conditions demand proactive adjustments: If you're balancing your lights with ambient hues, explore how bi-color panels solve mixed ambient without introducing unwanted color casts.
| Condition | Light Adjustment | Color Impact |
|---|---|---|
| Turbid water (5-10m visibility) | Increase magenta by 5-8% | Counters green cast without oversaturation |
| Deep blue water (>20m) | Add 10% red in-camera | Preserves skin tones before data loss |
| Shallow reef (<5m) | Reduce blue by 7% | Prevents unnatural cyan highlights |
For marine photography techniques in variable conditions, implement a three-tier backup:
- Primary: Battery-powered lights with thermal monitoring
- Secondary: AC-powered surface units with stabilized voltage
- Tertiary: Manual color slate for post-reference
Conclusion: Build Your Predictable Color Workflow
True color accuracy underwater comes from treating lighting as a system, not just gear selection. By planning thermal management, validating power calculations, and calibrating for water conditions before your dive, you'll capture footage that needs minimal post-production. The most reliable color correction happens before the shutter clicks.
Your actionable next step: On your next dive, run a 30-minute test with lights at 75% power. Measure color temperature every 5 minutes with a calibrated meter. Document the point where thermal drift begins, then set that as your maximum runtime. This simple test creates a repeatable baseline that eliminates guesswork in future shoots.
Remember the core principle that guides all my work: quiet, cool, color-true without hunting for outlets or breakers. Whether you're shooting vows in a venue or coral reefs offshore, consistent color comes from understanding the physics of light and power, not chasing maximum output.
Related Articles